Saturday, 3 August 2013

App to Enable Write on /system partition in HTC One with Stock Kernel

When it comes to modding, HTC One is definitely not the most mod friendly phone. One reason is that the /system partition is write protected on the stock HTC One (M7) kernel, making it impossible to make customization or use a particular app that requires write access to system partition. An amazing app ‘HTC One RW’ by Team Trickster is now available on Google Play, that lets you make /system writeable in a single click! The app uses uses flar2′s wp_mod.ko module, stericson’s roottools and busybox binary to accomplish this task. Requires root access!
Requirements:
- HTC One (M7U, M7UL, M7WLS) 
- Root (Refer: How to Root HTC One & Install Custom Recovery using Mac) - Stock HTC kernel on Sense or GE ROM
2013-07-16 14.58.05
HTCOneRW helps HTC One users with stock kernel load flar2@xda’s wp_mod.ko module to disable system write protection on the stock HTC One kernel. To make /system partition writeable, firstly install the app, then tick mark ‘Load on boot’ option and select Load (Grant Superuser access when asked). Then remount /system as rw and now write permission should be enabled on your /system partition.
Note: ONLY use this on Stock Sense Kernel
Download HTC One RW [Play Store Link]

Locate your Lost Android Phone with ‘Android Device Manager’ by Google

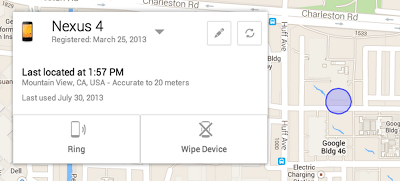
Google has just announced that they will be launching the Android Device Manager to help users track their lost or stolen Android device. Though, there are several apps in the Play store with similar functionality but it’s always great to have an integrated service from Google. This phone finder service will be available later this month on devices running Android 2.2 or above, as a part of Google Play Services.
blogpost
With Android Device Manager, you can find your Android phone or tablet by quickly ringing it at maximum volume even if the device has been silenced. You can also locate the device on a map in real-time if it is out of your reach, perhaps left in a cab or a restaurant. It shows information like when the device was last located, last used and the area where it is likely present. Unfortunately, if you’re unable to recover your stolen phone then you can quickly wipe all the data on the device, to stay safe and secure.
Tracking? You can track the stolen Android smartphone using the web interface which requires you sign into your Google account or use the official Android app, that Google will provide to let you to easily find and manage your devices.

Fix – MS Excel & Word 2010/ 2013 Hangs at ‘Opening in Protected View’ in Windows 8

Those using Microsoft Word, PowerPoint, Excel 2010 or 2013 must have noticed that Outlook attachments and documents originating from the Internet or a potentially unsafe location, are opened in Protected view. Protected View is a read-only mode where most editing functions are disabled. While this security feature was implemented to protect users from any kind of malware that can harm their computer but it might become annoying too. There seems an issue with Office 2010 and Office 2013 in Windows 8 where most office documents (Word, Excel or PowerPoint file) downloaded as an email attachment, on opening just hangs and get stuck at a screen titled ‘Opening in Protected View’. We have no idea as why this happens but luckily there is an easy workaround to fix this issue and open your office files like before!
26-07-2013 16-22-17
Method 1 – Disable Protected View for Word, Excel, PowerPoint in Office 2013 & 2010(You need to do this specifically for the relevant office program such as Word, Excel, or PowerPoint.)
  1. Go to File > Options.
  2. Open Trust Center > Trust Center Settings > Protected View.
  3. Uncheck the first 3 options from the right panel and hit Ok.
27-07-2013 01-05-42
Now all your MS office files will open up normally instead of Protected mode.
Method 2 – Unblock the document (Recommended)
Those who don’t wish to disable the protected view (offers enhanced security) must use this method. But here you first need to manually unblock every protected document to open it normally such as relevant .doc/.docx, .xls/.xlsx, .ppt/.pptx files.
To Unblock a protected file, right-click on the saved document and open its properties. Under General tab, click on the Unblock option next to Security “This file came from another computer and might be blocked to help protect this computer.”
26-07-2013 19-13-13
Now try opening the file and it should open fine even with Protected View enabled.

Windows Phone 8: Pin Email Label or Folder to the Start Screen

Windows Phone 8: Pin Email Label or Folder to the Start Screen

windows-phone-featured
The minimalistic design of the email app inside Windows Phone 8 often causes navigating troubles for users, especially when they want to access labels or folders.
Accessing the labels or folders inside the email app takes four steps. However, by pinning the label to the Start screen, it can be accessed by a single tap.
1.Go to the app list, and choose the inbox that contains the label or folder that you want to pin to the Start screen.
windows phone 8 email
2.Inside the email app, tap on the small dots to expand the menu list, and then choose thefolders option from there.
windows phone 8 email folders
3.The inbox and show all folders options will show up on the screen. To show all labels and folders, tap on show all folders.
windows phone 8 email folders
4. In the labels and folders list, find the one that you want to pin to the Start screen. Long press on the name, and choose pin to start.
pin email folders to start
5.Right after you have choosen the option, you will be redirected to the pinned tile on the Start screen. If you want to pin more folders or labels, press the back button on the phone and repeat the process.
pinned email label at start screen
6.When you access the label directly from the Start screen, you can look at the top of the screen to identify the current location. In this example, important is the label name, and Google Mail 3 is the inbox name.
windows phone 8 email label

Windows 8.1: Disable Searching Online with Bing

In Windows 8, users cannot only search for files in the hard drive, but they can also search for information online. The results are provided by Bing, Microsoft’s search engine. If you want to keep your searches local, you can disable the Bing integration.
Below is an example of how the system gives you online results of a search term when you use the Search feature in the Charm bar. Results come with big images. Only three or four results can be displayed on screen; however, you can use the scroll wheel to see more results.
windows 8.1 online search result with bing
1.First, you need to access the Settings section of the computer. Move your mouse to the upper or bottom-right of the screen to show the Charm bar, and then choose Settings. Alternatively, you can press the Win key + C to show the Charm bar.
windows 8.1 settings
2.Next, choose Change PC settings from the slide out panel.
windows 8.1 change pc settings
3.In the Settings panel, navigate to Search & apps -> Search.
windows 8.1 search and apps
4.To enable or disable using Bing to search online, toggle the Get search suggestions and web results from Bing option.
windows 8.1 use Bing to search online
5.When this option is enabled, you can configure Bing to give you personalized results that use your location, personalized results that do not use your location, or no personalized results at all.
In order to give you personalized results, Microsoft will use your search history, your account information, and your location.
windows 8.1 personalize search result
Furthermore, you can change the SafeSearch level when using Bing. By default, the setting is set toModerate, which filters inappropriate images and videos from the result but not text. If you want safer results, set the setting to Strict to filter out everything that is inappropriate. If you do not want to filter anything at all, set it to Off.
windows 8.1 Bing safe search
6.When you are done, just close the Settings panel, and the changes will be saved automatically. Later, you can come back to the same screen to re-activate the feature.

Windows 8.1: Show the List of Apps When Going to Start


In Windows 8.1, whenever you click the Start button, the system takes you to the Start screen with live tiles by default. If you miss the old function of the Start button which lists all installed apps on the system, you are in luck. This tutorial provides a step-by-step guide for you to bring the old function back. Continue reading to find out how.
Although it is possible to list all the apps on the system when clicking on the Start button, the interface is not exactly the same. Power or control panel shortcuts are not listed.
1.First, go to the Desktop view. If you are in the Start screen, click on the Desktop. If the tile is not pinned to the Start screen, pressing the Win key will do the same thing.
windows 8 start screen
2.Next, right-click on the task bar at the bottom of the screen, and choose Properties. If the task bar is hidden, moving the mouse to the bottom will make it slide up.
windows 8 8.1 taskbar properties
3.In the new pop-up window called Taskbar and Navigation properties, switch to theNavigation tab.
taskbar and navigation properties
4.In this tab, make sure to enable the Show the Apps view automatically when I go to Start option. This will replace the Start screen live tiles with the app list view when you click the Start logo or press the Win key on your keyboard. To access the tiles, simply swipe down, or click the arrow icon.
When the app list replaces the tiles, you can choose to show the desktop background on Startinstead of the theme background.
For people who use multiple screens, make sure to check Always show Start on my display when I press the Windows logo key.
show app list on start
5.This is how the apps list looks with the desktop background.
app list with desktop background
Here is how the apps list looks with a solid color that matches the theme.
windows 8.1 app list blue theme

Say you can’t move your entire data center to the edge of the Arctic Circle, where it’s constantly frigid and the electricity is cheap. How do you cool the furnace-like heat that big data-storage spaces generate? Use hot water from computers to drive the refrigeration of others. IEEE Spectrum reports. “The electrical energy that goes into the computer is converted into heat, essentially, and if you could reuse that heat somehow, then you recover a large part of the energy and the cost that you put into this,” says Tilo Wettig at the University of Regensburg in Germany. Basically, that waste heat can be used to drive a special kind of refrigerator called an adsorption chiller. The chillers produce cold water, which is then used to cool other computers in the data center or provide air-conditioning for the site’s human workers. The Regensburg team spent over a year operating a new liquid-cooling technology meant for large-scale, piping-hot computer clusters. They call their research platform iDataCool. Since the project was carried out in collaboration with the IBM Research & Development Laboratory, the researchers based it on IBM’s iDataPlex server system, designed for high-performance computing. [The] key innovation of iDataCool is its low-cost, custom-designed copper heat sink, through which the water flows, drawing away heat. The processor heat sink is hard-soldered to a copper pipeline with flowing water, which is attached to heat sinks affixed to other components in the system, such as memory and voltage controllers. Energy from all this hot water (above 65 degrees Celsius) drives the adsorption chiller, which feeds a separate cooling loop in the data center. The energy recovered was about 25 percent of what would’ve been lost (better thermal insulation could get it to 50 percent). Most of our laptops are cooled by air, often with fans. Liquid-cooled systems are more expensive and require more maintenance (water causes irreparable damage to circuits), so its biggest deterrent might be the fear of putting up a little more money for a system that isn’t widely used. The results were presented at the International Supercomputing Conference in Leipzig, Germany, last week. [Via IEEE Spectrum] Image: SuperMUC (with a similar warm water cooling system) / LRZ

Due to increased heat produced by overclocked components, an effective cooling system is necessary to avoid damaging the hardware. Overclockers go to great extents to keep their valuable hardware cool in the face of ridiculous speeds. Here are a few examples of MHz junkies that might have gone just a little too far while trying to keep their computers cool (in no particular order):


  1. The Turbocharger: This guy had an old turbocharger lying around and decided to put it to good use, pumping air into his flaming hot case faster than any 90mm fan out there.

  2. Liquid Nitrogen Cooled: The Reigning Champion, used again and again with every new chip released. The only way to go for a new 3DMark record. This was used to cool a P4 over clocked to 5.25Ghz!

  3. The Oversize Fan: Built on Plastic Tubing, with a rediculously large fan. Completely custom case with probably the best ventilation possible.

  4. Pool Cooled PC: Cooler Computer, Warmer Pool. This guy integrated the water cooling system for a few computers with his pool's piping to get a cheap and efficient water cooling system.

  5. The Case Fan Case: This case consists of 70 Case Fans total, all blowing air into or out of the case. The fans aren't screwed onto the case, they are the case.

  6. The Cookie Jar Trick: A fan mount, air duct, and hard drive silencing enclosure -- all in one! This practical mod is for anyone running a high speed HDD but looking for some silence at night.

  7. Refrigerant Cooled PC: Think of it as Liquid Nitrogen Lite. This mod uses the same technology as a refrigerator, and is fairly cheap if you have the supplies.


  8. The Water Cooled PC: From 1885? This beautiful rig combines style and substance. Truly a work of art.

  9. The Cooking Oil PC: $1000 worth of hardware submerged in oil. The vegetable oil acts as a good coolant but doesn't conduct electricity. Just don't play Crysis for ten hours straight or you'll end up with some deep fried chips.

  10. Air Ducts: Foam Boards Direct Air Inside Case. This is another cheap and practical mod anyone can do. A few peaces of cardboard and a couple fans to efficiently direct air in any case.

This article was written by SpeedingComputer.com Computer News. Speeding Computer offers interesting tech information and computer news. If you are interested in contributing to the thinking process and become a guest writer on The Thinking Blog, find out more information here and be my guest!